VBS is over and it was beyond AMAZING!!! But now that I don’t have my mind racing in a million directions, I can focus on doing stuff for school… including crafting. So I am finally going to contribute to Tara’s Made it Mondays! I know it’s Friday…. but I am going to join on Monday. You can check out more of her great ideas and other crafters linking up here
Well Leslie, what did you make??
I made this awesome toolbox!
I have been dying to make this thing since last summer when I saw Rebecca’s Toolbox. Here is a picture of hers.
You can read about her Tool Box on her wonderful blog
So how did I make mine??? First head to Lowe’s or click on the Amazon link (if you can wait a few days) and buy yourself this little beauty. My friend and I had a mini- pinterest party and each made one. Love Pinterst Parties!!! Gotta get one going for Back 2 School.

Focus……. I didn’t like the blue color, so that meant SPRAY PAINT…. Take out all the little drawers. Then go outside, prime it and paint it.
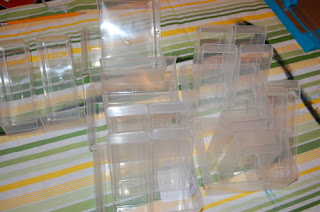 |
| All the little drawers |
 |
| Ready for Paint |
 |
| YES!!! Don’t forget the Primer |
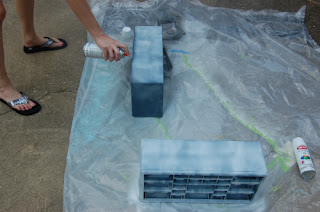 |
| Lots of Primer…. should have put more on mine |
 |
| A glossy white spray paint is added |
|
|
|
 |
| Dry Time |
|
|
|
Now while your box is drying, go visit Rebecca’s site
Create Share Inspire and print out 2 copies of the labels that she made onto 2 different colors of card stock. She has a link on her site. Now if you’re like me, you might not use all her labels…. like chalk or rings, but you can always double up on one you use a lot of. For me… that was Paper Clips…. I live off paper clips… they are always in my pockets and my husband goes nuts finding them in the washer or dryer. Oh well…. you never know when you need a paper clip. A-D-D…… Focus…… labels…… Cut the labels out.
Now using scrap book paper, trace around the big labels on the back of the paper.
Then cut out all your large rectangles that you traced. I used 2 different types of scrapbook paper.
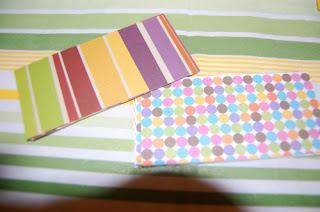 |
| My paper |
 |
| Kim’s paper |
|
|
Now trim your big labels. I used my trusty paper cutter.
 |
| Look at the nice fan formation Kim made. She laughed the whole time I took pictures of EVERYTHING! |
|
|
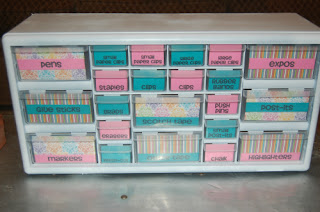
Now use one of those sticker dot roller things to place your labels on your paper.
Then get yourself some of this tape…. its double sided sticky tape that is clear. LOVE IT! And why does it say permanent??? Because its not… you can remove that stuff… no prob…. maybe not from the paper….
I never use this tape, but had it in my junk drawer and it was perfect for this project. We tried placing tape on the back of the labels and then along the side, but it just was not working out. Just get some of this stuff and place it on the front of your label… I know its going to be tough… I had the moment of apprehension thinking that I was about to ruin my nice label. But trust me… no one will see this tape on the front of your label.
 |
| Kim’s Box |
 |
| My box. I told you….. you cant see that tape…. right??? No…. |
|
The final finishing touch was adding our names to the top of the boxes.
Cute Cute!!! Thanks Rebecca for the inspiration!!!!!! Happy Crafting!!!


Those are super cute. This has been on my "to do list" for awhile. Your instructions are easy to follow- maybe I'll get a move on it .
ahhh I need to add my name to mine! I love it 🙂
fourth grade fanatics
They turned out great!
I was working on mine and noticed that the tape I used is not sticking well. I must go buy the tape you suggested tomorrow.
What did you use to write your name on the toolbox?
Hey Suzy- I just free handed it, but you could use a cricut or some extra dye cuts if you wanted. Thanks for your sweet words! That tape is double sided sticky tape and clear. Hope you find some!
What a great idea! I can't wait to make one.
This is awesome! I love the way your added the names to the top of the box. It turned out so good!
Thanks for sharing,
~Andi
Hi Leslie!!!! So glad you could join in on the fun this week!!! I think when this summer is over..every teacher in the world will have a teacher toolbox!! Love how yours turned out:)) Thanks for linking up:) HOpe you can come back next week:))
4th Grade Frolics
Your boxes cam out super cute!
Brandi
Success in Second Grade
I love that you added your names to the top of the boxes! Great idea!
Kara
Spedventures
Great tool box! Thanks for showing all the steps it took to create it! I am also one of your latest followers!
Super cute! Love your step by step instructions! 🙂
TeachPrayLove
Oh my goodness your teacher toolbox is super cute! I have seen these all over pinterest and have been wanting to make one but assumed the toolbox itself would be too pricey! Thanks for showing all the steps to making it.. I'm adding it to my ever-growing list!
Ashley
That's So Second Grade
Your toolboxes turned out so cute, thanks for the helpful tips to create one.
Jill
Bubbalulu.blogspot.com
They look great! I did one a few weeks ago, but hadn't even thought about putting my name on top! That's a must do now!
I love reading your wonderful blog. There's lots of great information here. I am nominating you for The Versatile Blogger and The One Lovely Blog Award. Visit my site to collect!
colorfulteaching.blogspot.com/
What did you do to the back? It is so ugly!
I left it alone… its going to be against my wall so I didnt worry about it. 🙂
Hi there!
I hope you can join me in my first ever Linky Party on "Preparing for School" over at {6th Grade} All-Stars
Hope to see you there!
Mrs. Crouse 🙂
I just finished the basics of mine. I decided not to paint, but instead cover with fabric. A little spray adhesive, and a yard of fabric and it was covered. I left the fabric doubled, and I will probably scotch guard it to keep it cleaner (hopefully) 7th graders are so messy sometimes! Anyway, keeping with the fabric theme, I am using ribbon behind the labels. I can't wait to finish this!
Cant wait to see it Shewett!!!
I had to revise my plan a little. The ribbon trim wasn't working the way I wanted it to, so….enter the fabulous duct tape! With a color that almost matched the fabric, I was able to cover all the loose ends of the fabric. The ribbon was still used behind the labels, and i can't wait to complete and stock my new organizer. If I could figure out how to post pictures, I would, but I am not that tech savvy (yet)!
So I am finally going to contribute to.
dissertation topics
Do I need to sand the box before I spray paint it?
Does the spray paint ever chip off??
Surprisingly no! I have moved that thing to 3 different locations and I think it sat in my garage a while a few years ago. It never chipped at all! Few little scuff marks here and there but not missing paint 🙂
Does the spray paint ever chip off…. that would be my only fear